I have been using and learning GStreamer multimedia framework for the last +5 years, during this time I have also sent back some contributions. My first contribution was the implementation of the Rust version of the HLS sink element in 2021 (hlssink3). But I cannot say that I had completely grasped the framework concepts, it is a very large project and full of conventions. You can only learn those conventions by reading the GStreamer code, writing GStreamer applications, and participating in the community. Still I constantly find myself thinking about pads, elements, pipeline, etc, and learning something new.
Recently, I thought about yet another way to deepen my knowledge of GStreamer: write GStreamer myself! Of course I am joking here, but why not a greatly simplified version of the framework focused on learning the basic concepts. Things like pads, elements, pipeline and buffers and some time/clock handling will get you a long way. I get asked frequently about “how to learn GStreamer” and my answer is always: write code with GStreamer. Today, we will write “GStreamer code” from scratch, so you won’t feel overwhelmed by all the information. We will call it “GStreamer Mini” (or gst_mini) and it is written in Python.
The Core Concepts and Objects
GStreamer is an object oriented framework, we have classes inheritance, properties, all the usual suspects (OOP abstractions). On top of those, like all code frameworks, we have core classes that we use to build upon. We will learn about Buffers, Pads, Elements, Pipeline, Clocks.
Buffers
Buffers hold the data we want to send through the pipeline. Buffers can hold any kind of data, GStreamer does not impose any limits on that. Ideally, buffers hold data that is temporal and produced over time in a streaming way (thus the name “streamer”). You can add anything to buffers, people has been using it to hold coded multimedia data, but you can use it to hold readings from your thermostat (that could be a cool GStreamer element actually). Trimming buffers to their bare bones fields, we are left with presentation time (PTS), duration, flags, and data.
We also define here some minimal flags we can set in our buffers. GStreamer has way more flags than those for buffers, but the EOS, DELTA_UNIT, and DISCONT will get us a long way. Those flags are direct takes from the real GStreamer codebase.
Clocks
The next concept we gonna implement are Clocks. As a streaming over time framework clocks are a very important concept for timing and syncronization. GStreamer implements multiple types of clocks, the basic definition of a clock in GStreamer is that it is always increasing through time (never goes backwards) and produces an absolute time. We will use the Python’s time module monotonic function and write a wrapper class around it with some helpers.
The Clock class will help us to track progress of time after a start instant. It also has a wait_until method which will be essential later for us to handle synchronisation in our elements. Again, those methods have direct relation to real GStreamer methods.
Elements
Elements are the steps of a GStreamer pipeline. Elements may produce, process, and receive buffers over time. Elements are specialised and focused on one function they process the buffers. I have talked about the different types of elements in GStreamer in my previous blog post “A brief introduction to GStreamer“. Here we will represent the most basic functionality of elements in GStreamer plus some helper methods.
I tried to keep this as simple as possible. One important part of this code is the handling of transition of states of elements. Elements always transition between all the following states in order:
- NULL: Initial state of elements or you can think of it as an uninitialized state;
- READY: Preparation of the element;
- PAUSED: This is when the element is basically ready to start processing data;
- PLAYING: Indicates the element is ready or already processing data.
You can read in much more details about each of those states in the official documentation. It is important to remember that elements always transition in order between those stages. This is critical and allows the elements to configure itself for pre-processing or resetting its internal state.

Lastly, we add a few methods to help us create pads on our elements. Pads are the next concept we will dive into.
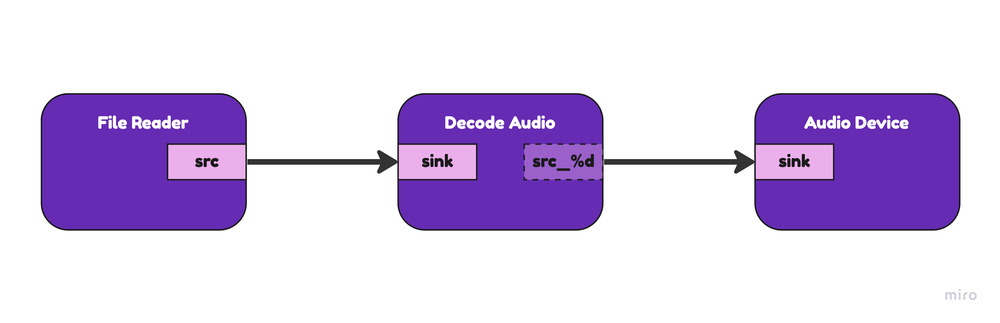
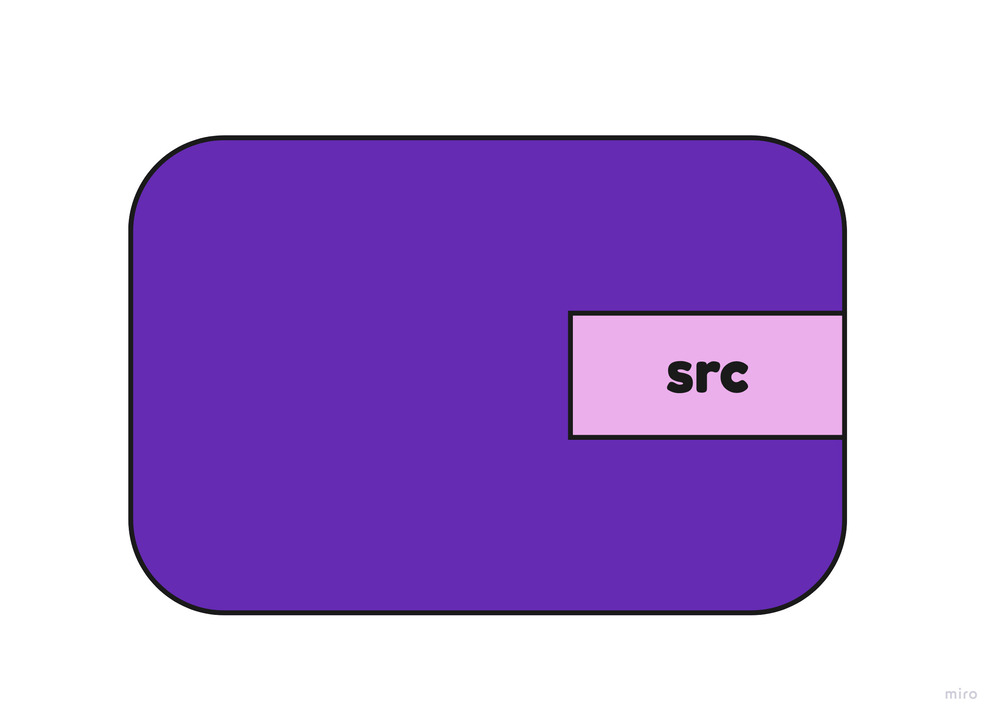
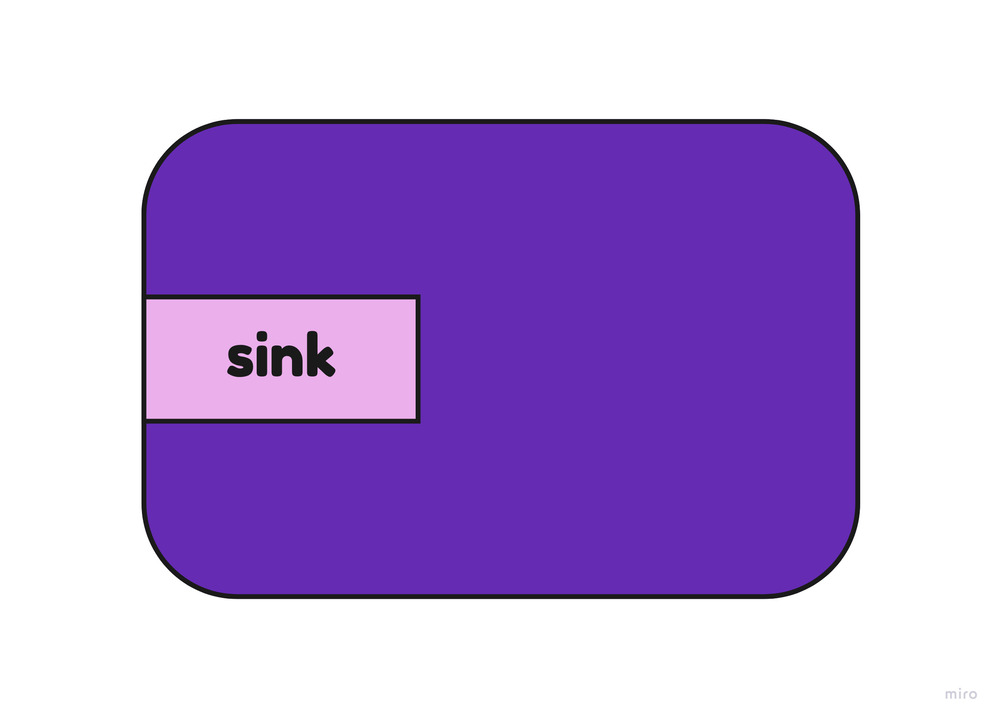
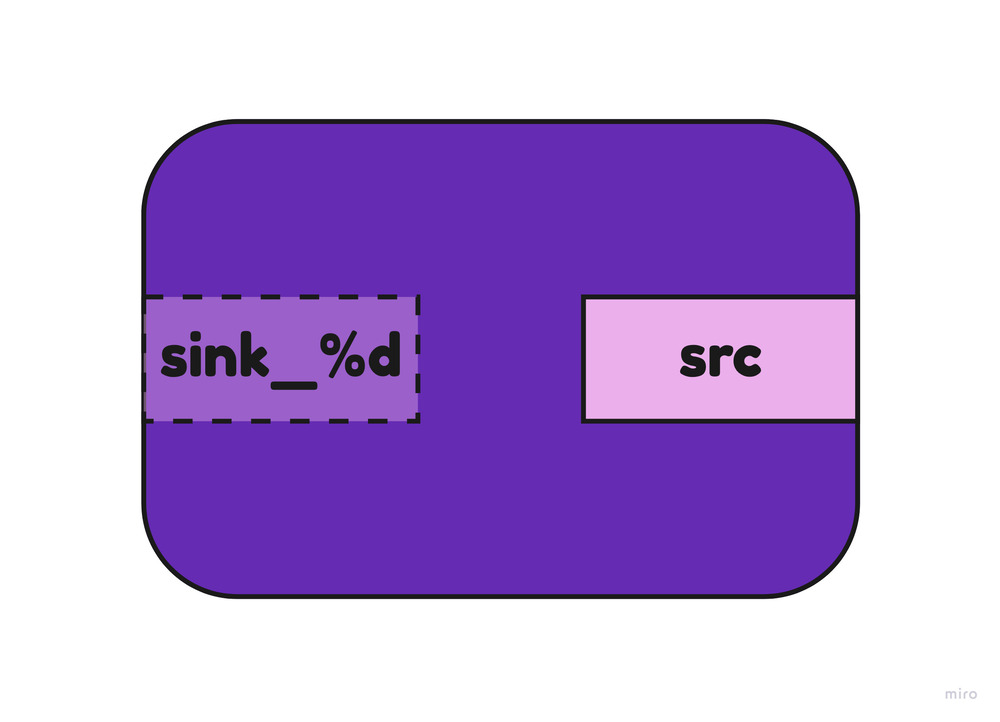
Pads
This might be a new concept for you, but you can think of pads like pipes where you push buffers between elements. You need to connect pads from a source element to a destination or sink element. Pads are another critical concept in GStreamer. Elements may contain one or many pads which can be dynamically created or static to the element (always present).
Our Pad implementation in gst_mini is greatly simplified. But I have tried to keep it relatable to the actual Pad implementation in the GStreamer codebase. Pads have a peer pad, which is populated when the pad is “connected”. A pad connection is a complex process in GStreamer, but the essence is that pads need to be compatible to connect. Pads have a “type”, which is called “caps” or capabilities, defining what type of data the pad is capable of handling. We are not representing capabilities in our codebase. We will be responsible and only connect compatible pads in our examples, promise.
One aspect of Pads that we must learn is the “chain function”. The chain function of a pad is the main way the buffer is handled by the pad and consequently by the element that the pad belongs to. When a source element pushes buffers to its src pad, the sink chain function of the peer pad is called. We implement this in our code and it is similar to what the GStreamer codebase does as well.
The call stack of the chain function would look like something like this:
datasource - PUSHING buffer 0
  encoder.chain() - RECEIVED buffer
  encoder.chain() - PUSHING encoded buffer downstream
    segmenter.chain() - RECEIVED buffer
    segmenter.chain() - PUSHING segmented buffer downstream
        publisher.chain() - RECEIVED buffer
        publisher.chain() - RETURNING OK to caller
    segmenter.chain() - RETURNING OK to caller
  encoder.chain() - RETURNING OK to caller
datasource - PUSH RETURNED: OK
We will dive more on this process in the future.
Pipeline
Another central concept of GStreamer are pipelines. As you might have guessed, pipelines hold a collection of elements that must work in synchrony. Pipelines trigger operations on elements and hold the shared concept of time among its elements. Elements must be added to a pipeline to work properly in GStreamer. In most cases, your GStreamer based application will be built around a pipeline. Pipelines can be hold very complex graphs with many elements.
Our simplified pipeline provides two main functionalities. It allows us to add elements and to change the state of the pipeline which is then reflected to all its elements in order. The pipeline also hold the clock which is shared among all elements of that pipeline, this is essential to provide synchronous execution. When a pipeline starts the time is captured, and that becomes the base time of all processing.

Segment
The last core concept we will represent is the concept of a GstSegment. Understand segments is important to decipher the time synchronisation in GStreamer. Segments allows us to convert the PTS of a buffer to its processing time based on the rate we want to process data. No matter if a pipeline process live content or pre-recorded content we want the processing to happen based on time. The realtime rate makes sense when processing live content or playing back the content, but if we are processing pre-recorded information we may want to process all the data of a 2 hours movie in an instant. GstSegment is an event in GStreamer, but we won’t be talking about events in gst_mini for now. We introduce the concept of segment here to keep our code minimally relatable to the GStreamer codebase.
The following formula is how we transform the buffer time in the relative running time of the pipeline:
running_time = (position - start) / rate + base
The position (or PTS) of the buffer is relative to the start of the pipeline. Then this difference needs to be adjusted by the rate of playback (which may be 1 in live or realtime pipelines). The base is the base time of the segment, which can be 0 or more. A pipeline might produce many segments, which have a monotonically increasing base time which is the end of the previous segment.
Why it is important to learn how to convert the buffer PTS to the running time? Because you will, at some point, find yourself in need to synchronise your element processing of a buffer to the global clock.
Creating Elements in gst_mini
We have a bare bones GStreamer mini implementation, but how to create elements? In this section we will create a few elements and connect them together to see processing happening using our gst_mini framework implementation.
The first element we will create is a “fake sink” element. This element does nothing, it just receive buffers and log information about those buffers.
We implement the basic functionality of a sink element, but without any other logic. The most interesting part of this code is that we implement the clock synchronisation similar to what the real GStreamer code does. We use the segment to calculate the running time and then use the pipeline clock to wait for that butter PTS in the pipeline clock before proceeding with processing. This is how sink elements, like displays can show the video frames at the exact time they need to be displayed to users.
We can now start creating a pipeline and using our new fakesink. This is already a good example of how the concepts and classes we introduced previously work together.
I highly encourage you to modify this code yourself. An specially interesting part I liked to adjust was the segment rate, which directly represents the rate of processing or playback of the buffers we are producing. We have a lot of logging and you will notice the changes in the time of processing. I find it super cool to play around.
Now we can implement a camera like element, producing buffers live.
This is a slightly more complex element implementation, but all the complexity is just to simulate a device producing content as specific time. We still leverage all the gst_mini framework and publish buffers to pads just like in real GStreamer code.
Now we have everything necessary to create our first full gst_mini pipeline and play it out.
Look at the logs and you will notice all the processing was right on time. I have also created a few other elements we can play around.
The fun continues
We have also S3Sink, HLSSegmenter, VideoEnc, and Queue. Those extra elements can be combined to create more interesting pipelines for education. This is not dealing with real multimedia content, this is just for demostration. Still I tried to follow some of the GStreamer concepts with them and may use them in future blog posts. For now, here we can see a more complex example combining some of those extra elements:
I highly encourage you to study the logs and add more logs in critical parts like state changes, pad handling buffer processing. You will create a very useful mental model that will help you read real GStreamer element code and also help you create your own elements. I like to browse through the elements in the gst-plugins-rs repository a lot. I really enjoy Rust and find the Rust bindings to be really good and readable, also using Rust for writing elements will prevent some common mistakes as the Rust type system is leveraged greatly to guide you.
Can GstMini do multimedia? Why not?
While playing around with this project I decided to implement a small multimedia example. For that I implemented a TkSink for displaying frame bytes to a window canvas. I used Tcl/Tk GUI toolkit just because it was the lowest effort as it comes together with the Python installation (usually). Also a very simplified FileSrc element but that is essentially similar to the real filesrc element. You can look up the example here:

This example is almost a 1-1 usage of GStreamer, and you can even run this real GStreamer pipeline to replicate it:
gst-launch-1.0 filesrc location=$HOME/Downloads/simple.png ! pngdec ! videoconvert ! imagefreeze ! osxvideosink
Or using the actual GStreamer bindings for Python.

Wait! Is that GStreamer?

GStreamer is a project that has been built over 20 years by very experienced engineers dealing with multimedia processing. The simplification in gst_mini does not reflect in any way the amount of details and pitfals GStreamer prevents or takes care for you. A non-exhaustive list of features we did not cover in GstMini:
- No caps negotiation
- No events (except implicit segment)
- No queries
- No buffer pools or memory management
- No state change ordering
- No preroll mechanism
- Single clock (no clock providers/selection)
- No activation modes (push/pull)
- No scheduling/chain optimization
- No latency calculation
- etc
Many of the media services you use today may rely on GStreamer one way or another. Do not be fooled by the ugly GStreamer website! I hope this post was helpful to you and that it was inspiring for you to continue learning more about GStreamer.